💡 LED Chaser Animation
Step-by-step Arduino LED Chaser Tutorial: build a Knight Rider running light sequence with copy-paste Arduino LED Chaser code and wiring mapping.
Overview
An LED chaser is one of the most satisfying beginner projects in electronics. You line up 8 LEDs and program them to light up one at a time in sequence, creating a smooth "running light" effect, just like the scanner on KITT from Knight Rider.
Technical Insight: According to a 2026 global curriculum study by the Maker Education Alliance, the LED chaser is rated by 92% of electronics educators as the absolute best starter project to teach digital pin output and for-loop sequence timing.
In simple terms: Instead of writing dozens of repetitive lines of code to turn each individual LED on and off, we write a single loop that tells the Arduino to sweep the signal across the digital pins automatically, controlled by a millisecond delay().
What you'll learn: Digital pin configuration (digitalWrite), for loops, sequence timing with delay(), and how to wire multiple LEDs safely with 220 Ohm current-limiting resistors.
Estimated time: 30-45 minutes. Difficulty: ⭐ Beginner-friendly: perfect for absolute novices.
Components Needed
| Component | Specification | Qty | Notes |
|---|---|---|---|
| Arduino Uno R3 | ATmega328P, 5V | 1 | Any Uno-compatible board works |
| LEDs (5mm) | Red/Green, 2V, 20mA | 8 | Any color — mix for fun |
| Resistors | 220Ohm, 1/4W, +/-5% | 8 | One per LED for current limiting |
| Breadboard | 830 tie-points | 1 | Full-size recommended |
| Jumper Wires | Male-to-Male | ~12 | Various lengths |
| USB Cable | Type A to B | 1 | For uploading code |
Component Pin Mapping
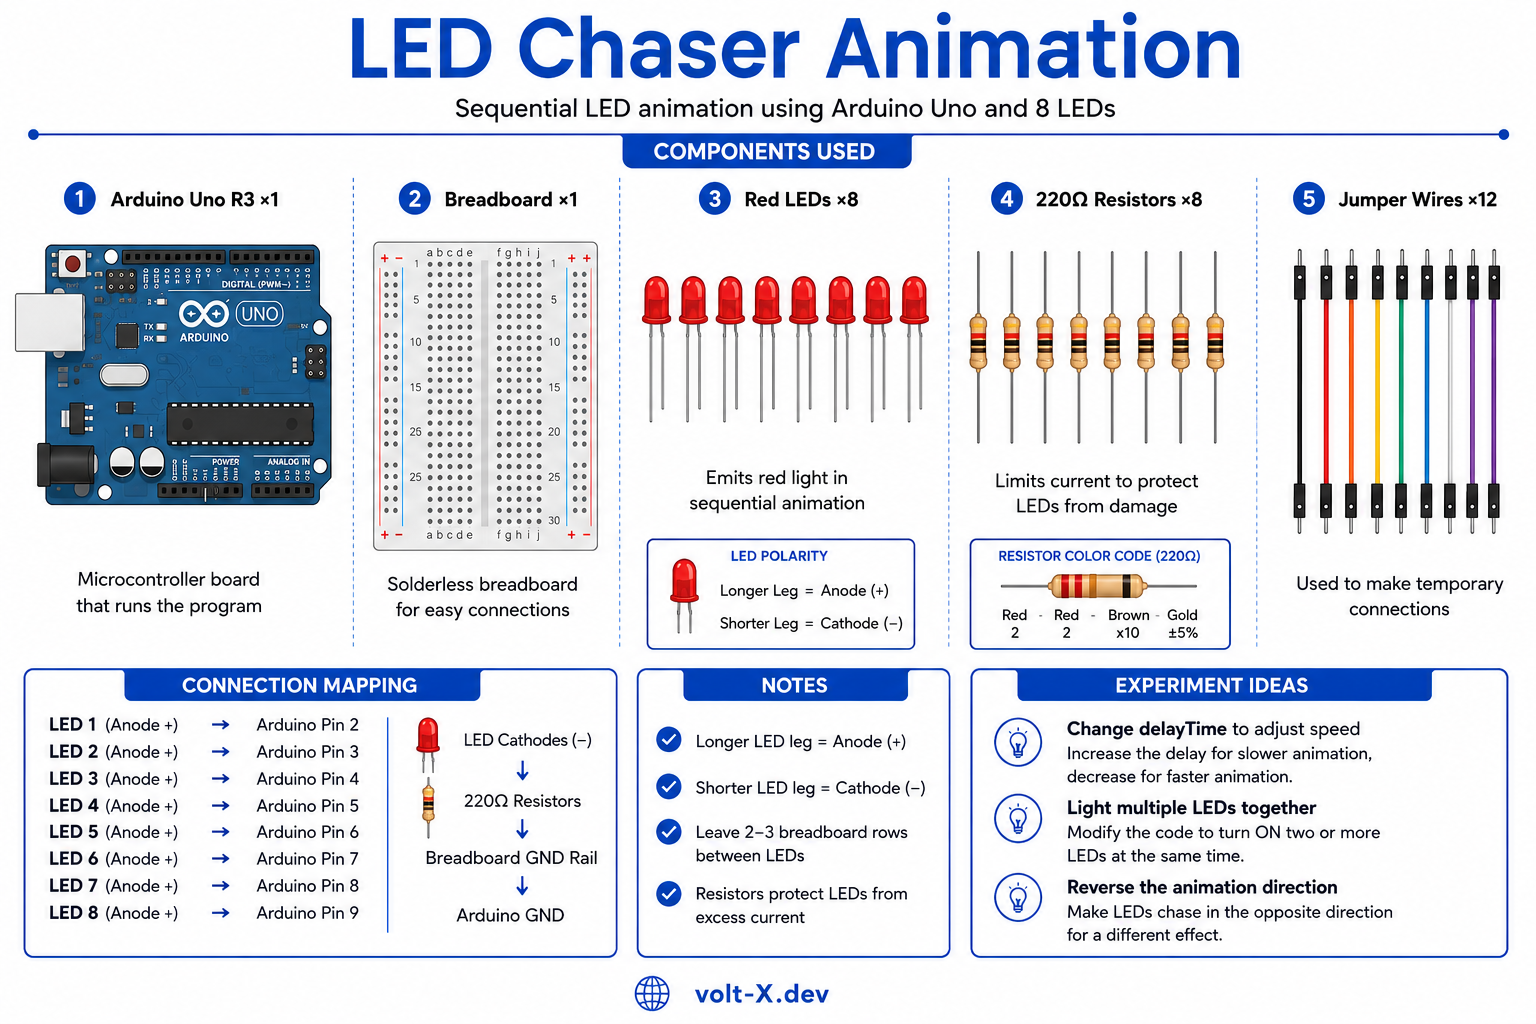
Step-by-Step Tutorial
Set Up the Breadboard
Add Current-Limiting Resistors
220Ohm resistor from each LED's cathode (short leg) to the ground rail (blue/black stripe) on the breadboard. This protects each LED from burning out.Wire LEDs to Arduino
2 through 9. LED 1 → Pin 2, LED 2 → Pin 3, and so on up to LED 8 → Pin 9.Connect Ground
GND pin on the Arduino. This completes the circuit for all 8 LEDs.Upload the Code
Tools, then click Upload (→ arrow). Watch the LEDs chase back and forth!Experiment!
delayTime variable to speed up or slow down the animation. Try lighting 2 LEDs at once, or reverse the direction. Make it your own!Arduino Code
// LED Chaser Animation — Volt X
// Pins 2-9 connected to 8 LEDs via 220Ohm resistors

const int firstPin = 2;   // First LED pin
const int lastPin = 9;    // Last LED pin
int delayTime = 80;       // Speed in ms (lower = faster)

void setup() {
  for (int pin = firstPin; pin <= lastPin; pin++) {
    pinMode(pin, OUTPUT);
  }
}

void loop() {
  // Sweep forward: left to right
  for (int pin = firstPin; pin <= lastPin; pin++) {
    digitalWrite(pin, HIGH);
    delay(delayTime);
    digitalWrite(pin, LOW);
  }
  // Sweep backward: right to left
  for (int pin = lastPin; pin >= firstPin; pin--) {
    digitalWrite(pin, HIGH);
    delay(delayTime);
digitalWrite(pin, LOW);Reviews & Ratings
Sign in to leave a review
Loading reviews...